
Installing luxury vinyl tile (LVT) flooring can seem difficult, but with some planning and preparation, even novice DIYers can achieve professional-looking results. This type of flooring has become increasingly popular for homes and businesses due to its attractive appearance, affordability, and low maintenance. You can achieve the best results by following these 10 tips to install LVT flooring like a pro.

10 Amazing Tips to Install LVT Flooring Perfectly
Clear the Room
Before bringing in any new flooring materials, empty the room and move out all furniture and boxes so you have ample open space to work in. Go through the entire area and remove any debris, dust, or loose pieces from the existing floor that could interfere with installation. Prepping a clear, clean workspace is the first step to efficient and hassle-free LVT flooring installation.
Gather Tools and Materials
There is nothing more frustrating than realizing you don’t have everything you need in the middle of a home improvement project. Do a full inventory check well in advance so you have what’s necessary for each installation phase, including:
- LVT flooring boxes
- Spacers
- Foam underlayment
- Saw or utility knife
- Tape measure
- Pencil
- Rubber mallet
- Straight edge
- Adhesive or double-sided tape (depends on installation method) Having these essential LVT flooring tools on hand prevents setbacks.
Acclimate the Flooring
One of the most common mistakes is failing to properly acclimate LVT materials to the room’s conditions. Per manufacturer guidelines, you typically need to store sealed boxes of tile or plank flooring flat in the room for 48 hours before installation. This allows the LVT to adjust to fluctuations in temperature and humidity to prevent possible buckling or damage post-install.
Prepare the Subfloor
Pre-installation prep work also involves assessing the subfloor (the foundation beneath your new LVT floor) and making any necessary repairs. Subfloors need to be as even, smooth, and permanently dry as possible. Fix major flaws like holes or cracks with an appropriate patching compound or leveler. Then do a complete sweep to eliminate dust, nails, staples, or residue so the new luxury vinyl tiles can adhere properly.
Lay Foam Underlayment
Most LVT flooring benefits from having foam underlayment installed first across the entire subfloor surface. This extra cushioning layer helps smooth out smaller imperfections as well as absorb sound for quieter floors. Cut sheets to fit tightly edge-to-edge and tape the seams. When installing LVT with a grip strip/loose lay method, underlayment also prevents friction and keeps planks securely in place.
Find Your Starting Line
When tackling a tile or plank layout, identifying the ideal starter line is key to keeping flooring square and organized across the room. Measure across the width of the subfloor at several points to find the longest straight section. Use a pencil to mark your perpendicular starting line across that edge. Chalk lines let you instantly check alignment during progress.
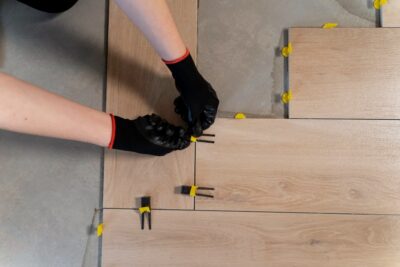
Dry Lay Tiles
Now comes the most important part out of these 10 tips to install LVT flooring like a pro. Start by dry fitting tiles or planks along your guidelines without adhering to them yet. This helps find the optimal layout spacing and arrangement before permanently setting materials. Check proportions so the edge tiles/planks are as equal in size as possible without leaving slivers. Adjust the starting position or tile cuts as needed.
Follow Adhesive Instructions
With dry fitting approved, carefully follow adhesive instructions for the application area and open times. Notching trowels create just the right amount of sticky surface to set tiles firmly in place. Follow a section-by-section process, spreading a workable amount of adhesive and then firmly pressing tiles into place by hand or with a rubber mallet. This prevents accidentally disturbing tiles you’ve already set during the installation process.
Cut LVT to Fit
Even with the most meticulous measurements, LVT flooring installation requires custom cutting around doorway openings, transitions to other flooring, and wall edges, and complete rows. Carefully measure and mark each section needing trim. Leave small gaps for expansion rather than forcing rigid tiles to fit.
Finish Floor and Admire!
After allowing proper adhesive drying times, your luxury vinyl flooring makeover is complete! Spend those first days back enjoying it without rolling around heavy furniture or appliances. Over time, placing rug pads beneath furniture legs can help preserve your LVT flooring investment with normal use. Following these 10 fundamental tips results in professional-grade installation worthy of showing off for years to come!
Conclusion
Installing LVT flooring takes careful planning, patience, and methodical execution from pre-prep to the final tile. While the process involves some key steps, novice DIYers can achieve beautiful, long-lasting results at home. Keep these 10 tips to install LVT flooring like a pro in mind and set yourself up for success the first time around. Focus on creating a flawlessly smooth subfloor, test-fitting tile layouts, using quality adhesives, and adding the perfect finishing details post-installation. With the right materials and commitment to each phase, your newly renovated space will look professionally installed and enhance your decor for years of enjoyment.


